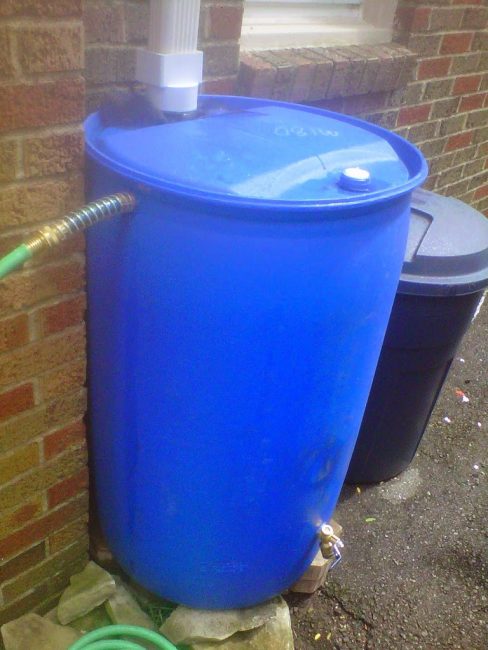
One thing that can be easily incorporated into the urban homestead and which is very useful to the backyard farmer is the rain barrel.
Rain barrels can be purchased in a lot of places these days but they are quite easy to make as well. We’ll discuss how to do this below.
If you want to buy them, I’ve highlighted the best ones.
Rain barrels are containers attached to the downspouts of houses, sheds, and garages. When it rains, the water runs through the spouting system as usual and then down into the collection barrel(s).
During one rain, the amount of water that runs through home downspouts is staggering and cannot all be collected by the rain barrels. Therefore, it is necessary to devise an overflow system for how to handle the rain water once the barrels are full.
How to build a rain barrel
Tools needed
- Barrels (if plastic is used, make sure to get food grade)
- Bulkhead spigot
- Hole saw kit and drill
- small piece of screen / mesh
- downspout adapter
- atrium grate
- garden hose kink protector
- hacksaw or similar tool
- silicone caulk (optional)
Directions
Attaching the rain barrel to the downspout. If you have a food grade plastic barrel like the ones we use (see images), there will be a round bung hole on the top (yes, that’s what it is called). Generally there are two holes, and to connect the downspout we will use the larger one.
Insert the round end of the atrium grate into the hole in the barrell. You may want to position a piece of screen mesh in order to ensure that mosquitoes cannot get into the barrel.
The filter end of the atrium grate can then be inserted into the round end of the downspout adapter.
Finally, the square end of the downspout adapter will be inserted into the downspout.
Cut off the downspout and insert the cut end into the square end of the downspout adapter.
Make sure to dry fit everything together and cut the downspout at just the right location. The fit should be snug but you should be able to easily remove the barrel to clean it out as needed.
Add the bulkhead spigot. Using a hole saw kit, drill a hole about 6 inches from the bottom of the barrel and insert the bulkhead spigot.
Make sure before drilling that you have enough room to position a watering can underneath the spigot if you will want to water this way. We set our barrels up on blocks in order to facilitate this.
Seal the spigot to the barrell with silicone caulk if desired.
Attach the overflow outlet. Drill another hole on the side of the barrel near the top and position the garden hose kink protector into it. The kink protector can be used to either connect another rain barrel to the first, or to run a section of garden hose into a garden bed. When barrel fills up, the water will run out of the kink protector and downhill to wherever you run the hose.
Seal this connection with silicone caulk if desired.

How we use our rain barrels
My property slopes downhill from the backyard to the front yard and then to the street. So the rain barrels on the house can be drained via a hose to water the front yard using gravity.
If the hose is connected to the top (the kink protector), the barrel is allowed to fill up, and any overflow will travel to the front garden.
To water the front yard between rains, I can connect the hose to the spigot at the bottom and open the faucet so that the whole 55 gallons can be drained to the front garden.
The overflow hose is run along the landscape in a way that cannot be seen by anyone (buried under mulch).
Using the overflow system I described, your could daisy chain multiple rain barrels together if desired.
The cool thing about this setup is that it is customizable to your needs.
Thanks for reading, and please share this article if you found it helpful.
