
In this article, we’ll cover the basics of getting a backyard farm up and running. By backyard farm we mean anything from a small garden plot to a larger, more systematic approach.
It all depends what you want to accomplish. We use the term backyard farming simply because it implies that we are taking a purposeful approach rather than just popping in some plants and hoping that they grow well.
As mentioned in What is Backyard Farming, or goal is to identify the things we want to achieve over time, and then design a plan to slowly implement them.
We advise against tearing up your whole property and implementing some grand plan. Start very slow and move forward once you get th hang of things.
Although it is certainly going to be necessary to convert some lawn areas to garden plots, one important thing for us is that we like lawns.
We like the look of a well manicured lawn and landscape. Furthermore, the kids still need somewhere to play kickball. Often permaculture folks are labeled as lawn haters, and some may very well be, but not us.
What we object to is struggling to maintain a virtually all lawn monoculture that provides minimal benefit. A reasonably sized lawn as a component part of an overall garden food landscape is what we are after.
The Plan: Start Small
For so many different reasons, it is important to start small and work outward, over time. You do not need to create a full yard plan compete with backyard chicken coops and composting toilets.
Go ahead and design a backyard farming wonderland on paper if you want to, but for the first year, start small by choosing one or two very easy things, placed in locations that make sense.
Next year you can build out. Things will fall into place much more naturally this way. We’ll get into some examples below.
Permaculture folks often refer to projects in terms of levels, and so a Level 1 activity would be something low risk and easy, such as a tomato patch; whereas a Level 5 activity would be something like building a pond.
List out some goals that you eventually want to accomplish, and slot them into Levels.
Each person is different. Maybe for you, installing a rain barrel on your garage is a Level 2 activity, but for someone else this seems more radical.
Here is a sample list:
Level 1 Goals
- Vegetable garden plot
- Herb Garden plot
- DIY Compost Bin
- Plant Fruit Trees
- Medicinal Herb patch
Level 2 Goals
- DIY Rain Barrel on back of house (maybe another one on the side, if that goes well)
- Asparagus Patch
- Climbing Roses up the side of the garage (or maybe a DIY Trellis)
- Raised Bed Garden plots
- Seed starting system
- Plant Berries (blueberry, raspberry, blackberry, etc)
- Canning and Preserving
- Learn to take cuttings (propagation)
Level 3 Goals
- DIY Micro Aquaponics Seed Starter (build one here) for the patio during the summer
- Hugelkultur plots (read about how to do that here)
- Grape vines
- Rain barrels on every downspout (possibly daisy-chain some together)
- Homemade soaps and cleaning products
- Wood burning stove
- Make oil from seeds
Level 4 goals
- Greywater diverter for the washing machine
- Grow grains and mill flower
- beekeeping (honey and wax production)
- chickens
- root cellar
- air layering (form of propagation)
- Cob House tool shed
Once your list is complete, the next step is to take one or two items from the Level 1 section and plan to implement them in year 1.
So for example, you may decide that from the above list you will (1) plant a kitchen vegetable garden and (2) build 2 compost bins, using our composting system (article).
Once this is decided, take a good look at your yard and see where you want to place these things.
One Permaculture concept is that the more of your attention something requires, the closer it should be to your house.
So a Kitchen vegetable garden should go right by the house, because it will require some attention (weeding, watering, etc.), and if one has to walk very far to get to it, it will start to become a hassle.
Plus, you will want to be able to dash out back to pick some ingredients when needed.
On the other hand, Asparagus which comes up every year (perennial) and requires less attention, can go farther away from the house.
Berries and fruit trees can go all the way in the back, since we do not need to fuss with these very often and when we do harvest, it is usually in larger batches. This concept is discussed in Permaculture Zones and Backyard Farming.
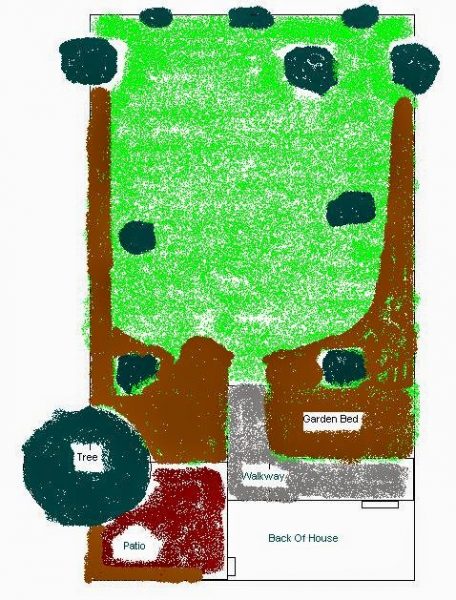
For example purposes, I’ll show you what I did when I started. I decided to implement a Kitchen Vegetable garden. The drawing below shows what my backyard looked like when I began. I had a few trees and bushes, a small patio, and a ton of lawn, all fenced in.

This was my backyard before I started
For the Kitchen vegetable garden, I laid out a 10 x 10 feet area of lawn located 5 feet from my back door. I converted the lawn to a garden bed using a the double dig technique (here).
I then planted tomatoes, peppers, and a few other things by going to a nursery in the late spring and buying the plants.
I skipped trying to start from seed because for me that was a level 2 or 3 endeavor.
Total time spent: about 4 or five hours at a cost of about $40.
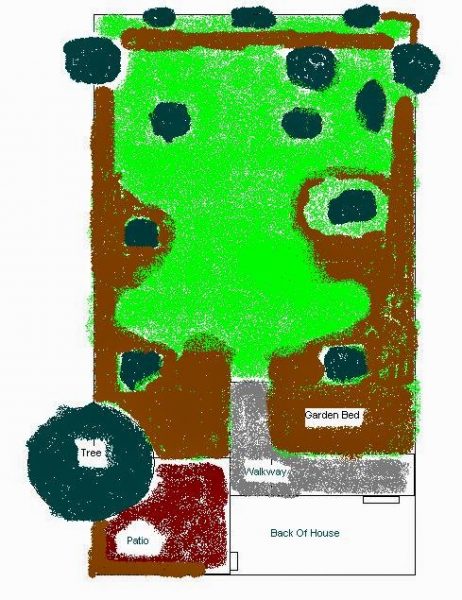
These bad drawings show backyard lawn (green), garden patches (brown) and trees (dark green).

My Backyard Year 1
The same year I also did the following:
- Set up two compost bins. I have a separate post on this topic. (3 hours, $40)
- In the fall, I planted 4 Magnolia trees. To me not everything has to be about food. I love Magnolias, and wanted to have some around. ( 8 hours, $400).
- Spread all of the compost that I made into the new garden bed and around the trees. I even spread some directly into my lawn.
Once Year 1 had passed, it was time to plan out what to do for year 2. Each successive year, you will want to implement some Level 1 things, but then start to slowly mix in some higher Level activities into your space.
Year 2 Activities:
- Installed 2 rain barrels (here). (5 hours, $80)
- Expanded garden beds as shown in Figure 3 (3 hours, “free”)
- Planted greens, strawberries, various vegetables. (4 hours, $50)
- Collected seeds in the fall
- Mulched the garden beds with moldy hay I got on Craigslist Free.
- Perfected Composting

My Backyard Farm Year 2
Year 3:
- Expanded Garden beds even further
- Built a Hugelkultur mound in one of the bed areas that measures about 6 feet long and about 3 feet high.
- Planted Grapes along the fence
- Planted about 10 Asparagus plants
- Planted a lot of things I started from seeds indoors as well of lots other things I purchased.
- Harvested dandelions and made dandelion coffee (make it here) as well as ate the dandelion tops battered and fried and the dandelion greens in salads (read about that here).
- Built two micro Aquaponics systems to use as seed starting beds powered by goldfish waste (build it here).
My Backyard Farm Year 3
Year 4:
- Expanded the beds and tried to pull together a more natural line for the garden boarders (work in progress).
- Started having really great success with seed starting indoors under fluorescent lights. Experimented with shop lights as well as CFLs. More on that another time.
- Planted a sour cherry tree, 2 apple trees, 2 blueberry bushes, 2 raspberry bushes, a patch of comfrey, potatoes, corn, etc.
- Heavily mulched with more hay and compost
- Built a swale/Hugelkultur combo spanning 50 feet across my back property in order to stop and capture water flow that was coming in to my yard during heavy rains and causing run-off. I’ll have a post on that later.
- Grew hundreds of mustard plants on the new Hugelkultur bed, right underneath 3 pine trees. Will have a post on making gourmet mustard.
- Experimented selling at the local farmer’s market.
My Backyard Farm Year 4
And so on…
In this way, I made sure that at each step, I was comfortable. Taking my time, I was able to place things where they fit naturally, and I gave myself time to observe what was working and what needed to be tweaked.
Design it to Look Beautiful
As far as aesthetic design, there are as many options as you can think of. Take a look around at landscape design photos that appeal to you.
Often these designs consist of plants you probably do not want, such as hostas, generic bushes, and purely ornamental trees, and that’s OK, just substitute in food crops where you can.
This is the sneaky awesome part of suburban farming. I can have 30 garlic plants incorporated into my front yard landscape feature and no one would know any differently.
Substitute in Kale and rhubarb for hostas and daylilies. You get the idea.
Put in a sour cherry tree instead of the flowering dogwood, and a blueberry for a taxus; and so on.
We’ll have an article about substituting in edible plants and medicinals for the typical boring landscape plants that are so overused in neighborhoods, but use your imagination and you will be fine.
This is where you can start to build up a huge diversity of wonderful plants like sunflowers, every kind of berry under the sun, echinacea, wheat, ground cherries, pumpkins, roses, patchouli, onions, potatoes, anything you can think of.
I have had potatoes out front and no one knew any different.
Interplanting a wide variety of plants of every type is one of the secrets of keeping the bad insects at bay since your garden will be balanced.
Remember to read our article on how to improve backyard soil (here) over over time as well. Also, keep in mind that the plants do not all have to be edible or medicinal, but every single thing in your garden should be something that you want.
Some things will do well where you plant them and some will not, and over time through observation, you will start to learn what does well in what locations. Put in whatever you like!
Also check out this link for some beginner tips for starting a vegetable garden here.
amzn_assoc_placement = “adunit0”;
amzn_assoc_search_bar = “false”;
amzn_assoc_tracking_id = “trybackfarm-20”;
amzn_assoc_ad_mode = “search”;
amzn_assoc_ad_type = “smart”;
amzn_assoc_marketplace = “amazon”;
amzn_assoc_region = “US”;
amzn_assoc_title = “Items you may enjoy”;
amzn_assoc_default_search_phrase = “garden design software”;
amzn_assoc_default_category = “All”;
amzn_assoc_linkid = “7a8bd5a27e2e774aba4813ab8726761a”;
amzn_assoc_rows = “2”;
Check out these products as well!