

Four days before the month ended, I learned that September is National Preparedness Month. Did you know that? What are your plans?
Really, any month or day is a good time to prepare for emergencies – floods, earthquakes, blizzards, tornadoes, and nasty human behavior. As we’ve seen, these things can strike suddenly and there’s no time to run down to BJ’s or even 7-11.
What will you eat if the power is out and store shelves bare? A good place to start is with what your garden grew this past summer and what it will produce into winter.
Preserving food has made a come-back; there is a lot of ‘global village’ advice available on how it’s done.
Mother Earth News, long-time guru of homesteading and simple living, provides a lengthy chart of storage time for produce. It’s in a comprehensive article on three standard food preservation methods:
- STORAGE. A cool, dry underground space – whether a root cellar or other construct – can protect foods for months. Traditionally these are built away from the house which would be pointless in the event of a flood or … something. If you can find a way to have your cellar in the basement, you’d be on to something.
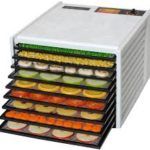
- DRYING. Dehydrating produce and herbs for use beyond the growing season has become more accessible as the cost of these appliances has come down while features have increased.
- CANNING. The way to preserve food before the advent of refrigerators has made a comeback in recent years. Food is placed in airtight, vacuum-sealed containers
and heat processed at 250 °F to destroy microorganisms and deactivate enzymes. As the food cools, a vacuum seal is formed that prevents any new bacteria from getting in. [SOURCE: USDA]
Clean, clean, clean is the first and most important rule when preserving foods. Clean hands, containers, and foods. The food you store can be the whole or a substantial supplement to other long-term storage foods. Which leads to another concern.
Food Safety Considerations
Food that is not under refrigeration must be prepared and stored in a way that prevents dangerous bacteria from building up. I was disappointed to learn that vacuum-sealing food is not the solution I thought it would be.
After all, commercially-produced foods come in vacuum-sealed packages. Why can’t I do the same at home? The process involves sucking oxygen out of a bag of food, which extends its shelf life. Foods should then be frozen or refrigerated, so this isn’t a viable method for safe storage if the electricity goes out.
Who knew the minimal oxygen environment actually encourages some types of bacteria to grow? Botulism and Listeria monocytogenes are two, notes Tess Pennington, author of The Prepper Handbook. Food can look perfectly fine but be filled with bacteria. Strike two for vacuum-sealed foods in an emergency setting.
More Caveats and Solutions
Shallow Pockets and Food Allergies
- Many pre-packaged, ready-to-eat meals are high-sodium or high-glycemic and can be light on needed nutrients.
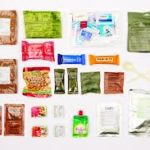
- Buying MREs
can be expensive.
- Commonly sold MREs contain food allergens such as wheat, nuts, or dairy. For those of us with uncommon allergens like corn and olives, the few gluten-free friendly MREs are also out of the question. An emergency situation is not the time to weaken your body by eating foods it cannot tolerate. Even more tragic would be to die from the lack of allergy-safe food.
Reduce costs by making your meals. This would go beyond simply drying what your garden has grown or is growing. It’s combining what you’ve grown with other dried foods and putting them into a packet or jar. Besides cost, you’ll feel better knowing exactly what you’re eating.
Can what your garden grew this summer, along with other sourced-foods, be turned into an MRE? Maaybe. I’m still looking for the secret of safely sealing up food for long-term on-the-shelf storage.
Why You May Want to Invest in a Dehydrator
Dehydrators have become popular enough to be affordable, with prices ranging from $30 to $200. They range from simple mesh-covered tiers for air-drying to plastic free, digitally controlled devices that can sit neatly on your kitchen counter. Although many kitchen ranges have a dehydrator setting, these portable countertop models are said to be more energy efficient.
Needed:
- Dehydration trays
- Parchment paper
- Produce & herbs
- Meats, fish, poultry
A dehydrator can create jerky, fruit leathers. But Cultures for Health relates that you can also make sourdough starter, yogurt, and pemmican.
Pemmican
The word pemmican comes from a Cree word for fat; the Lakota word wasna defines this nutrient-dense food more exactly as ‘anything ground up’. Traditionally made from dried berries pounded together with dried game and a fat (usually rendered from the animal supplying the meat).
A naturally low-carb, good protein/fat food that provides energy and nutrients like B vitamins, Vitamin A, protein, iron, copper, magnesium, and zinc. It stores easily, travels well, and can safely be eaten years after its made (if properly stored).
And it’s pretty easy to make. The Alderleaf Wilderness College offers four recipes. Ingredients for two of them:
- 2 cups dates
- 3 cups powdered jerky (or powdered tofu-jerky)
- 2 cups raisins
- Honey (as a binding agent, add as much as needed)
- 2 cups nuts
- 4 cups lean meat (deer, beef, caribou or moose)
- 3 cups dried fruit
- 2 cups rendered fat
- Unsalted nuts and about 1 shot of honey
Meat-free Pemmican
Search and you’ll find there are a few vegetarian pemmican recipes with nuts and grains (flours) replacing meat.
Augmenting the Garden with Shelf-Stable Foods
Perhaps the simplest solution I’ve found so far is to make packets of shelf-stable foods that are free of whatever your collection of allergens may be. If you have a chronic health condition like diabetes or kidney disease, consult with the respective association for guidance on calories and nutrients.
In making these DIY prepper snack kits, it might help to keep in mind the Recommended Daily Allowances from the Food and Nutrition Board of the Institute of Medicine, National Academy of Sciences. If you’re the truly detailed-oriented type, a customized nutrient profile can be developed for your age and gender.
Assemble a snack-fest of foods like:
- Nut butter packets
- Tuna/salmon/sardines packets or tins
- Hummus packets
- Homemade crackers or flatbread
- Cereal/protein/granola bars
- Mini cereal boxes
- Multivitamins
These don’t need to be heated or rehydrated. Portion sizes are small enough that there shouldn’t be a problem with storing open packages. Choose brands carefully to avoid unwanted allergens or excessive salt or sugar. The last thing you’ll want to do is max out your day’s water ration because of a dry or salty food (sugar can make you as thirsty as salt).
Sites like Minimus provide a variety of foods and other things that could go into an emergency pack. Big box stores, camping/outdoor stores, and regular grocery or department stores are also sources of RTE foods. It wouldn’t hurt to compare costs before buying up a bagful of supplies. Once you’ve made up your snack packets, consider storing them in thick water-proof containers.
If you have the liquid to spare, consider packets of a whole food protein powder.
There was a time I would’ve included baby food on such a list but, realistically, there aren’t enough nutrients in those cute packets to carry an adult very far. And some do have corn or other starches in them.
Sheltering in Place with Garden Goods
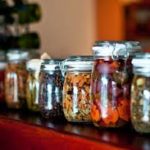
Are you prepared to shelter in place for at least three days? Meals in jars would be ideal. But if they have to be reconstituted, you’ll have to factor that into your water storage planning.
I came across a few sites promoting dry canning, which is sealing dehydrated foods into sterile glass jars with an oxygen absorber. While those few sites wax poetic about the process and claim a 5- to 8-year shelf life, standard sources like the U.S. Department of Agriculture and FoodSafety.gov and even Mother Earth News are silent on the subject. I would strongly suggest you do your own research on this before undertaking a project. As appealing as the sight of rows of pretty food jars lining a pantry shelf may be, Safety First. Always.
Preparedness Reminders
This has nothing to do with growing or using homegrown goods. But, since the subject of this post is disaster preparedness, it’s appropriate because food is just one element in planning for an emergency. Creating a plan for your household should take into account:
- how alerts and warnings will be received
- knowing when to go to designated community shelters or shelter in place
- evacuation route
- specific needs according to age, health, dietary and medical needs, disabilities, cultural and religious considerations, and pets and service animals
These points and others are covered by Ready.gov (U.S. Federal Emergency Management Agency) and the U.S. Centers for Disease Control and Prevention which have tons of information. Are you prepared?
Back to Farming
Ironically, one of the last references that I looked at for survival foods took me back to indoor gardening. I was supposed to be writing about the feasibility of a basement garden but, after recent events here in the States and abroad, this topic seemed more pertinent.
This article may be updated as I get more info on food prep and storage. And I’d better get to my indoor gardening series since that too is a part of disaster preparedness.
Thanks for reading, and please share this article if you found it helpful.